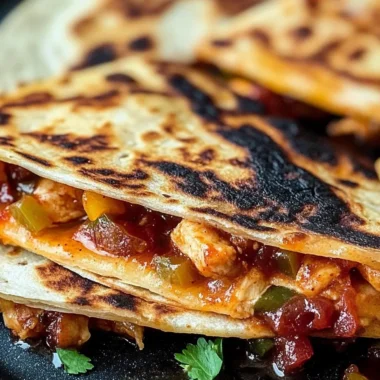
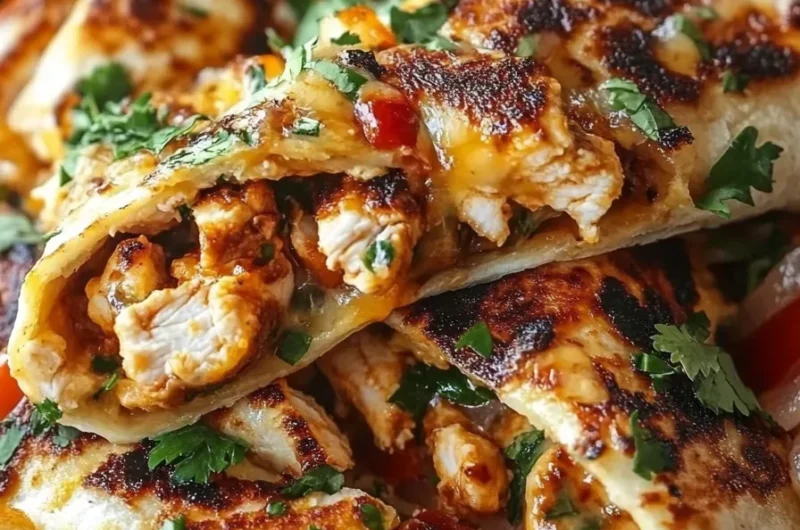
Ooey-Gooey Cheesy Garlic Chicken Wraps You’ll Devour is the ultimate comfort food that combines layers of flavor and texture. With tender chicken, melted cheese, and aromatic garlic enveloped in a warm tortilla, this dish is not only indulgent but incredibly satisfying. Imagine the savory aroma wafting through your kitchen as these wraps come together. Each bite delivers a delightful combination of flavors that will leave you wanting more!
Whether you’re gearing up for a family dinner, hosting a gathering, or looking for a quick and easy weeknight meal, these wraps are sure to impress. The gooey cheese melts perfectly, creating an irresistible filling that pairs beautifully with the seasoned chicken and the garlic infusion. Moreover, the wraps are versatile and can be customized with your favorite ingredients, making them a hit for all taste preferences.
In this article, we’ll take a deep dive into why you’ll love this recipe, walk you through the preparation time, and provide a detailed list of ingredients and step-by-step instructions. With tips on how to serve these mouthwatering wraps, you’ll have everything you need to create a dish perfect for any occasion. Let’s get started on this ooey-gooey journey that every cheese lover will appreciate!
Why You’ll Love This Recipe
There are countless reasons why Ooey-Gooey Cheesy Garlic Chicken Wraps are a favorite among food lovers. Here are just a few:
1. Irresistibly Flavorful – Combining the richness of cheese and the smoky flavor of garlic creates an explosion of taste in every bite.
2. Quick and Easy – This recipe comes together quickly, making it perfect for busy weeknights or impromptu gatherings with friends.
3. Customizable – Feel free to add your favorite vegetables or spices to the mix. You can easily tailor the recipe to suit your specific tastes.
4. Crowd-Pleaser – These wraps are always a hit at parties. Served as appetizers or a main dish, they never fail to impress.
5. Kid-Friendly – With cheesy goodness and familiar flavors, even picky eaters will be eager to enjoy these wraps.
6. Meal Prep Friendly – Make a batch ahead of time, and reheat whenever you need a quick meal. They’ll stay delicious and comforting even after they are warmed up.
With these fantastic attributes, it’s no wonder that Ooey-Gooey Cheesy Garlic Chicken Wraps become a staple in many households!
Preparation and Cooking Time
Preparing these cheesy wraps won’t take much of your time. Here’s a quick overview of what to expect:
– Preparation Time: 15 minutes
– Cooking Time: 20 minutes
– Total Time: 35 minutes
These times may vary slightly based on your cooking skills and kitchen equipment, but this guide provides a good estimate.
Ingredients
– 2 cups cooked chicken, shredded
– 1 cup shredded mozzarella cheese
– 1 cup shredded cheddar cheese
– 3 tablespoons minced garlic
– 1 tablespoon olive oil
– ½ teaspoon smoked paprika
– 1 teaspoon Italian seasoning
– Salt and pepper to taste
– 4 large flour tortillas
– ½ cup sour cream (optional)
– Fresh parsley for garnish (optional)
Step-by-Step Instructions
Creating these delicious Ooey-Gooey Cheesy Garlic Chicken Wraps is simple! Follow these steps for the best results:
1. Preheat Oven: Begin by preheating your oven to 375°F (190°C).
2. Sauté Garlic: In a large skillet, heat olive oil over medium heat. Add minced garlic and sauté for 1-2 minutes until fragrant, being careful not to burn it.
3. Mix Chicken and Seasoning: In the same skillet, add the shredded chicken, smoked paprika, Italian seasoning, salt, and pepper. Stir and cook for another 3-5 minutes until heated through.
4. Add Cheese: Remove the skillet from heat and mix in the shredded mozzarella and cheddar cheese. Stir until the cheese is melted and well combined with the chicken.
5. Assemble Wraps: Lay each tortilla flat on a clean surface. Spoon an equal portion of the cheesy chicken mixture onto the center of each tortilla.
6. Roll Wraps: Fold the sides of the tortilla over the filling, then roll from the bottom up to create a neat wrap.
7. Bake Wraps: Place the wraps seam-side down in a greased baking dish. Bake in the preheated oven for 15-20 minutes, or until the tortillas are golden brown and crispy.
8. Serve Hot: Remove from the oven and allow for a few minutes of cooling. Cut them in half or quarters if desired.
9. Garnish (Optional): If wished, drizzle with sour cream and garnish with fresh parsley before serving.
How to Serve
When it comes to serving your Ooey-Gooey Cheesy Garlic Chicken Wraps, consider these tips to make it even more enjoyable:
1. Plating: Arrange the wraps on a colorful platter to enhance visual appeal. Consider using a serving board for a rustic touch.
2. Dips: Offer additional dips like avocado sauce, salsa, or ranch dressing for extra flavor.
3. Side Dishes: Pair the wraps with a fresh salad, potato wedges, or even a soup for a complete meal.
4. Garnishing: A sprinkle of chopped parsley or a squeeze of lime can elevate the presentation and taste.
5. Beverages: These wraps pair nicely with soft drinks, iced tea, or even a light beer for adults, providing a refreshing complement to the richness of the cheese.
By following these tips, you’ll make your meal even more memorable and delicious! Enjoy your creation and savor every cheesy, garlicky bite!
Additional Tips
– Use Fresh Ingredients: Fresh garlic and high-quality chicken will elevate the flavor of your wraps significantly.
– Don’t Overstuff: While it’s tempting to fill your wraps to the brim, overstuffing can make them difficult to roll and cook evenly.
– Use Cast Iron Skillets: For sautéing the garlic and chicken, a cast iron skillet distributes heat evenly, enhancing the cooking process.
– Experiment with Herbs: Fresh herbs like cilantro or basil can brighten the flavors of your wraps. Add them for a fresh twist.
– Preheat the Tortillas: Warming the tortillas in a pan for a few seconds on each side can make them more pliable, preventing tearing during assembly.
Recipe Variation
Be creative and customize your Ooey-Gooey Cheesy Garlic Chicken Wraps with these variations:
1. Spicy Chicken Wraps: Add sliced jalapeños or red pepper flakes for a kick of heat.
2. Veggie Lover’s Version: Substitute some chicken for sautéed bell peppers, onions, and mushrooms for a hearty vegetarian option.
3. BBQ Chicken Wraps: Mix in some barbecue sauce with the chicken mixture for a tangy twist.
4. Cheese Swap: Experiment with different cheeses like pepper jack, gouda, or feta for a unique flavor profile.
5. Breakfast Wraps: Use scrambled eggs, sausage, and cheddar cheese for a delicious breakfast twist.
Freezing and Storage
– Storage: Store leftover wraps in an airtight container in the refrigerator for up to 3-4 days. Reheat in the oven or microwave when ready to eat.
– Freezing: These wraps can be frozen before baking. Wrap them tightly in foil or plastic wrap and store in an airtight container. They will last for up to 3 months in the freezer. To eat, bake the frozen wraps at 375°F (190°C) for 25-30 minutes, or until heated through.
Special Equipment
While this recipe doesn’t require specialty equipment, a few basic kitchen tools will make the process easier:
– Large skillet for sautéing
– Mixing bowl for combining ingredients
– Sharp knife for chopping
– Baking dish for baking the wraps
– Oven mitts to avoid burns when handling hot items
Frequently Asked Questions
Can I use rotisserie chicken instead of cooking chicken from scratch?
Absolutely! Rotisserie chicken is a great time-saver and adds flavor to your wraps.
Can I prepare the chicken mixture ahead of time?
Yes, you can prepare the chicken mixture a day in advance. Just store it in the refrigerator until you’re ready to assemble and bake the wraps.
What if I don’t have flour tortillas?
You can substitute flour tortillas with corn tortillas or even lettuce wraps for a low-carb option.
Is this dish gluten-free?
To make this recipe gluten-free, opt for gluten-free tortillas and ensure that any seasonings you use are certified gluten-free.
Can I make these wraps vegetarian?
Yes! Replace the chicken with a variety of vegetables like zucchini, spinach, and mushrooms. Consider adding some beans or tofu for protein.
Conclusion
Ooey-Gooey Cheesy Garlic Chicken Wraps You’ll Devour not only make for a delicious meal but also bring joy to any table. Their versatility, quick preparation, and crowd-pleasing qualities ensure a satisfying experience for all. Whether you serve them at a gathering or enjoy them for a quick weeknight dinner, these wraps are bound to be a hit. So, roll up your sleeves, gather your ingredients, and dive into this cheesy, garlicky goodness. Your taste buds will thank you!

Ooey-Gooey Cheesy Garlic Chicken Wraps You’ll Devour
- Total Time: 35 minutes
Ingredients
– 2 cups cooked chicken, shredded
– 1 cup shredded mozzarella cheese
– 1 cup shredded cheddar cheese
– 3 tablespoons minced garlic
– 1 tablespoon olive oil
– ½ teaspoon smoked paprika
– 1 teaspoon Italian seasoning
– Salt and pepper to taste
– 4 large flour tortillas
– ½ cup sour cream (optional)
– Fresh parsley for garnish (optional)
Instructions
Creating these delicious Ooey-Gooey Cheesy Garlic Chicken Wraps is simple! Follow these steps for the best results:
1. Preheat Oven: Begin by preheating your oven to 375°F (190°C).
2. Sauté Garlic: In a large skillet, heat olive oil over medium heat. Add minced garlic and sauté for 1-2 minutes until fragrant, being careful not to burn it.
3. Mix Chicken and Seasoning: In the same skillet, add the shredded chicken, smoked paprika, Italian seasoning, salt, and pepper. Stir and cook for another 3-5 minutes until heated through.
4. Add Cheese: Remove the skillet from heat and mix in the shredded mozzarella and cheddar cheese. Stir until the cheese is melted and well combined with the chicken.
5. Assemble Wraps: Lay each tortilla flat on a clean surface. Spoon an equal portion of the cheesy chicken mixture onto the center of each tortilla.
6. Roll Wraps: Fold the sides of the tortilla over the filling, then roll from the bottom up to create a neat wrap.
7. Bake Wraps: Place the wraps seam-side down in a greased baking dish. Bake in the preheated oven for 15-20 minutes, or until the tortillas are golden brown and crispy.
8. Serve Hot: Remove from the oven and allow for a few minutes of cooling. Cut them in half or quarters if desired.
9. Garnish (Optional): If wished, drizzle with sour cream and garnish with fresh parsley before serving.
- Prep Time: 15 minutes
- Cook Time: 20 minutes
Nutrition
- Serving Size: 4 wraps
- Calories: 450 kcal
- Fat: 20g
- Protein: 35g