
Master the art of making crème brûlée with a blowtorch and create a dessert that’s silky inside and perfectly caramelized on top.
Introduction
Crème brûlée is one of those classic desserts that feels luxurious yet remains attainable for home cooks. Learning how to make crème brûlée with a blowtorch can seem intimidating, but it’s actually quite simple with the right approach. This comprehensive guide covers everything you need to know—from the creamy custard to the crunchy caramelized topping—so you can master this iconic French dessert in your own kitchen.

What is Crème Brûlée?
Crème brûlée, also known as “burnt cream,” is a traditional French dessert made with a rich custard base, topped with a hard caramelized sugar layer. This contrast between creamy and crunchy is what makes it truly spectacular. The blowtorch is the secret weapon that allows you to achieve that perfect caramelized topping without heating the custard itself.
The Importance of a Blowtorch in Crème Brûlée
Using a blowtorch is essential for getting the classic crispy top that defines crème brûlée. The blowtorch lets you caramelize the sugar in a controlled way, ensuring a balanced contrast between the creamy base and the crunchy top.
Ingredients You Need for Crème Brûlée
For the custard base, the following ingredients are required:
- Heavy Cream: 2 cups. This will give the dessert its creamy texture.
- Egg Yolks: 5 large, to create a rich custard base.
- Granulated Sugar: 1/2 cup plus extra for the topping.
- Vanilla Extract or Vanilla Bean: 1 tablespoon extract or 1 vanilla bean.
Optional Ingredients for Flavor Variations
- Orange Zest: Adds a citrus note.
- Espresso: Introduces a subtle coffee flavor.
- Cinnamon: For a warm, aromatic twist.
- Lavender: Adds a floral hint for a sophisticated taste.
- Chocolate Chips: For a decadent and rich texture.
Step-by-Step Guide on How to Make Crème Brûlée with a Blowtorch
1: Prepare the Custard
- Heat the Cream: In a medium saucepan, heat the heavy cream over medium heat until bubbles form along the edges—don’t let it boil.
- Flavoring the Cream: Add the vanilla bean or vanilla extract to the cream for flavor. Remove the vanilla bean after heating.
- Mixing Egg Yolks and Sugar: In a bowl, whisk together the egg yolks and sugar until they become a pale, creamy mixture.
- Temper the Eggs: Gradually pour the warm cream into the egg mixture, whisking constantly to avoid scrambling.
2: Baking the Custard
- Set Up a Water Bath: Pour the custard mixture into ramekins. Place the ramekins in a baking dish and add hot water until it reaches halfway up the sides.
- Bake: Bake in a preheated oven at 325°F (163°C) for 30-40 minutes or until the custard is set but still has a slight jiggle in the center.
- Cool: Remove from the oven and let the ramekins cool to room temperature, then refrigerate for at least 4 hours or overnight.
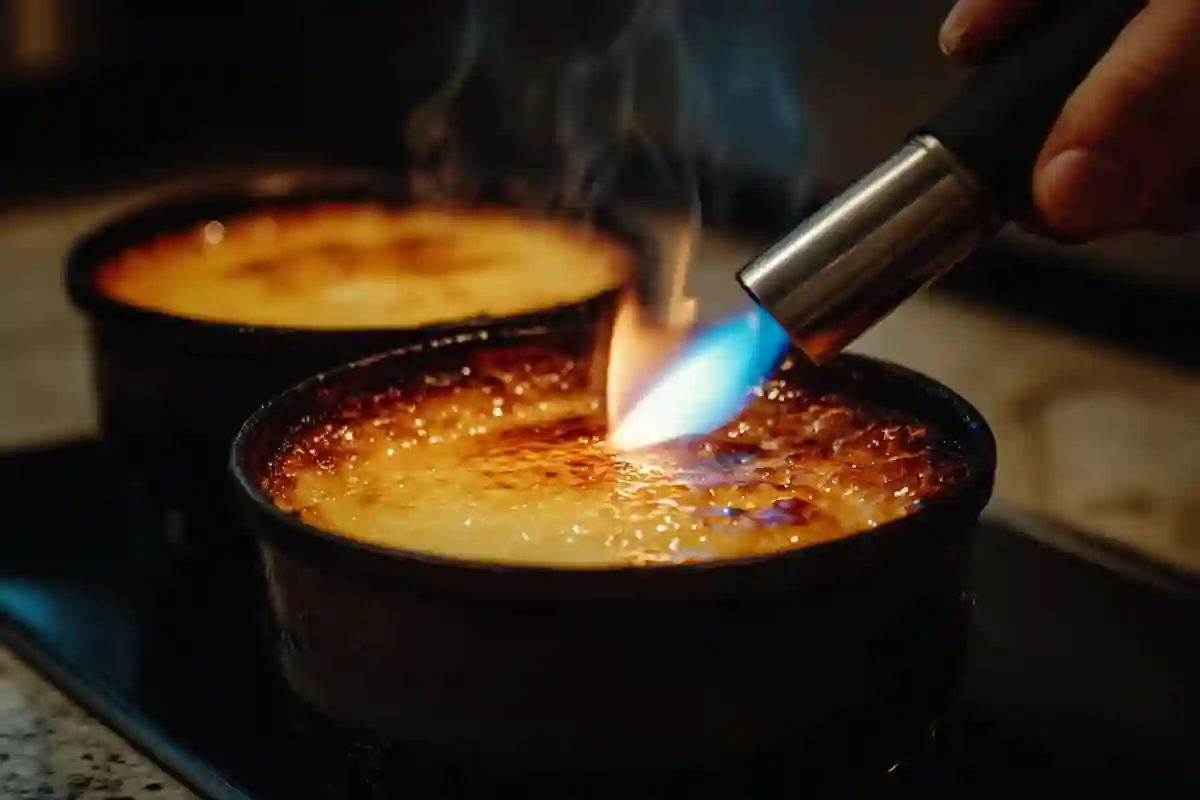
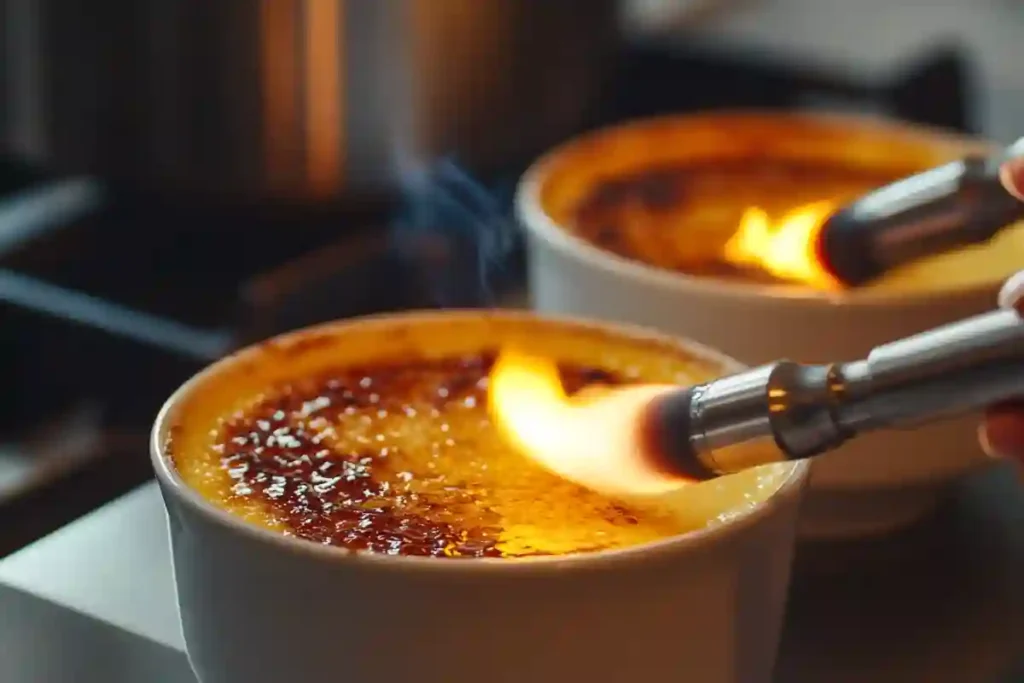
3: Caramelizing with the Blowtorch
- Add Sugar to the Top: Just before serving, sprinkle a thin, even layer of granulated sugar on top of each custard.
- Use the Blowtorch: Ignite your blowtorch and sweep it back and forth over the sugar until it melts, bubbles, and turns a golden brown.
Tips for Blowtorch Success
- Use Even Motion: Keep the blowtorch moving to prevent burning the sugar.
- Hold the Blowtorch Steady: Keep the flame about 2 inches away for even caramelization.
- Cool Slightly: Let the sugar crust cool for a minute before serving to allow it to harden properly.
Common Problems and How to Fix Them
1. Custard Too Runny
- Problem: The custard didn’t set properly after baking.
- Solution: Ensure the oven temperature is correct, and bake until the center is just barely set.
2. Burned Sugar Topping
- Problem: The sugar turns black instead of caramelized.
- Solution: Hold the torch at a greater distance, and keep it moving to prevent overheating.
3. Lumpy Custard
- Problem: Custard isn’t smooth.
- Solution: When tempering eggs, pour the warm cream slowly and whisk constantly to prevent cooking the yolks.
4. Grainy Texture
- Problem: The custard has a grainy texture.
- Solution: This often happens if the eggs cook too quickly. To avoid this, ensure you temper the eggs gradually by adding the cream in a slow stream while whisking continuously.
Crème Brûlée Flavor Variations
1. Chocolate Crème Brûlée
- Add 4 ounces of melted dark chocolate to the warm cream before combining it with egg yolks.
- This version is ideal for chocolate lovers and adds an extra layer of depth to the dessert.
2. Citrus Crème Brûlée
- Add zest from an orange or lemon to the cream while it heats up.
- It adds a bright, refreshing twist that pairs beautifully with the creamy base.
3. Coffee Crème Brûlée
- Stir in 1 teaspoon of instant espresso powder into the cream.
- It’s perfect for those who love the deep, rich flavors of coffee.
4. Lavender Crème Brûlée
- Add 1 teaspoon of dried lavender to the cream while heating it. Strain out the lavender before combining with egg yolks.
- Lavender adds a floral aroma that gives a sophisticated twist to the classic custard.
5. Salted Caramel Crème Brûlée
- Mix 1/4 teaspoon of sea salt into the custard mixture and drizzle some caramel sauce over the custard before baking.
- This version balances the sweet and salty for a perfect dessert experience.
6. Matcha Crème Brûlée
- Add 1 tablespoon of matcha powder to the custard mixture before baking.
- This green tea variation adds an earthy flavor and a vibrant color to your crème brûlée.
7. Spiced Crème Brûlée
- Add 1/2 teaspoon of cinnamon and a pinch of nutmeg to the cream while it heats up.
- Perfect for fall, this version has a warm and aromatic twist.
How to Serve and Garnish Crème Brûlée
- Fresh Berries: Garnish with a mix of fresh raspberries, blueberries, or strawberries.
- Mint Leaves: A sprig of mint adds a pop of color.
- Whipped Cream: Add a dollop of freshly whipped cream for a luxurious touch.
- Edible Flowers: Add edible flowers like pansies or violets for an elegant, restaurant-quality presentation.
- Powdered Sugar: Lightly dust the top with powdered sugar for an extra touch of sweetness and visual appeal.
- Caramel Drizzle: Drizzle a small amount of caramel sauce on top for added sweetness and decoration.
Serving Tips
- Chill Before Serving: Keep the custard cold before torching the sugar to ensure the contrast between the cold custard and hot sugar.
- Serve Immediately After Torching: Crème brûlée is best enjoyed right after caramelizing the sugar when the crust is fresh and crunchy.
- Serve with a Side: Consider serving with shortbread cookies or biscotti for an added crunch that complements the creamy custard.
Tools You Need to Make Crème Brûlée
1. Blowtorch
- A culinary blowtorch is essential for caramelizing the sugar topping. Look for one that has an adjustable flame and is easy to refill.
2. Ramekins
- Use 4-6 ounce ramekins for baking the custard. The size is ideal for creating the perfect serving and allows for even baking.
3. Baking Dish
- A large baking dish is needed to hold the ramekins and create the water bath that ensures gentle, even cooking.
4. Fine Mesh Strainer
- A strainer is helpful when pouring the custard mixture to remove any lumps and ensure a smooth texture.
5. Whisk and Mixing Bowl
- A whisk is crucial for combining the egg yolks and sugar, while a mixing bowl allows for easy whisking without splattering.
6. Heatproof Measuring Cup
- A heatproof measuring cup can make pouring the custard mixture into the ramekins easier and more precise.
7. Kitchen Thermometer
- A kitchen thermometer can be helpful to ensure the cream doesn’t overheat. Keep it below 180°F to avoid curdling.
The Science Behind Crème Brûlée
Understanding the Custard
The perfect crème brûlée is all about the balance between creaminess and firmness. The egg yolks provide the thickening agents, while the heavy cream gives it that luxurious, smooth texture. By heating the cream before combining it with the yolks, you’re ensuring that the custard bakes evenly.
Why a Water Bath is Crucial
The water bath (or bain-marie) helps regulate the temperature around the ramekins, ensuring that the custard cooks gently. This is crucial to avoid curdling the eggs or creating an uneven texture.
Caramelization Explained
Caramelizing the sugar on top involves breaking down sucrose into simpler sugars through the application of intense heat. The blowtorch gives you control over the caramelization process, allowing you to achieve the perfect amber color without burning.
Eggs and Emulsification
The emulsification process, where egg yolks blend with cream, is key to creating a stable and creamy custard. Whisking thoroughly helps the yolks disperse evenly, ensuring a uniform consistency throughout the dessert.
Health Considerations for Crème Brûlée
Caloric Content
Crème brûlée is a rich dessert, and its high caloric content comes primarily from heavy cream and egg yolks. One serving can contain between 250-350 calories, depending on the portion size and the added flavors.
Reducing Sugar
If you want a less sweet version, you can reduce the sugar in the custard by a third without significantly affecting the texture. The sugar on top, however, is crucial for the crispy crust, so it should be kept intact.
Dairy-Free Alternative
For those who are lactose intolerant, substitute heavy cream with full-fat coconut milk. The texture will be slightly different, but it’s a great way to enjoy crème brûlée without the dairy.
Lower-Calorie Version
To create a lighter version, consider using half-and-half instead of heavy cream, and opt for a natural sugar substitute like erythritol for the custard base.
High-Protein Version
To add more protein, substitute half of the heavy cream with Greek yogurt. This will give a slightly tangier flavor but also boosts the protein content of the dessert.
Portion Control Tips
If you’re watching your caloric intake, try using smaller ramekins for individual servings. This allows you to enjoy the rich flavors of crème brûlée in a controlled portion size.
Frequently Asked Questions (FAQs)
1. Can I Make Crème Brûlée Without a Blowtorch?
- Yes, you can use your oven’s broiler setting. However, be cautious, as this method can be less controlled, and it’s easy to overcook the custard.
2. How Do I Know When the Custard is Done Baking?
- The custard should be set around the edges with a slight wobble in the center.
- You can test by gently shaking the ramekin. If it jiggles like gelatin, it’s ready.
3. Can Crème Brûlée Be Made Ahead of Time?
- Absolutely! You can make the custard up to two days in advance. Just add the sugar topping and caramelize it right before serving.
4. Is It Possible to Freeze Crème Brûlée?
- Freezing crème brûlée is not recommended since it can affect the texture of the custard and make it grainy once defrosted.
5. Why is My Crème Brûlée Too Sweet?
- Adjusting the sugar is key. You can reduce the sugar in the custard if you find it too sweet. Be sure to taste test to get the balance just right.
6. How Do I Avoid Air Bubbles in My Custard?
- To avoid air bubbles, strain the custard mixture through a fine mesh strainer before pouring it into the ramekins. Tap the ramekins gently on the counter to release any trapped air.
7. What’s the Best Sugar for the Caramelized Topping?
- Granulated sugar is the best option for caramelizing as it melts evenly and forms a solid crust. Avoid powdered sugar, which can burn too quickly.
8. How Long Can Crème Brûlée Last in the Fridge?
- Crème brûlée can be stored in the refrigerator for up to 3 days. Keep it covered with plastic wrap to prevent it from absorbing other odors.
9. Can I Use a Kitchen Torch Instead of a Blowtorch?
- Yes, a kitchen torch is ideal for caramelizing the sugar. Just make sure it has a consistent and adjustable flame for best results.
Conclusion
Crème brûlée may seem like an intimidating dessert to make, but with a little practice and a blowtorch in hand, you’ll soon be impressing your friends and family. This step-by-step guide on how to make crème brûlée with a blowtorch ensures your custard is perfectly set, and the sugar topping is crisp and golden. Use this classic recipe as your foundation, and don’t hesitate to experiment with different flavors and garnishes. Enjoy the delightful contrast of creamy and crispy textures that make crème brûlée a true classic.
Related Article: Crab Brulee Recipe