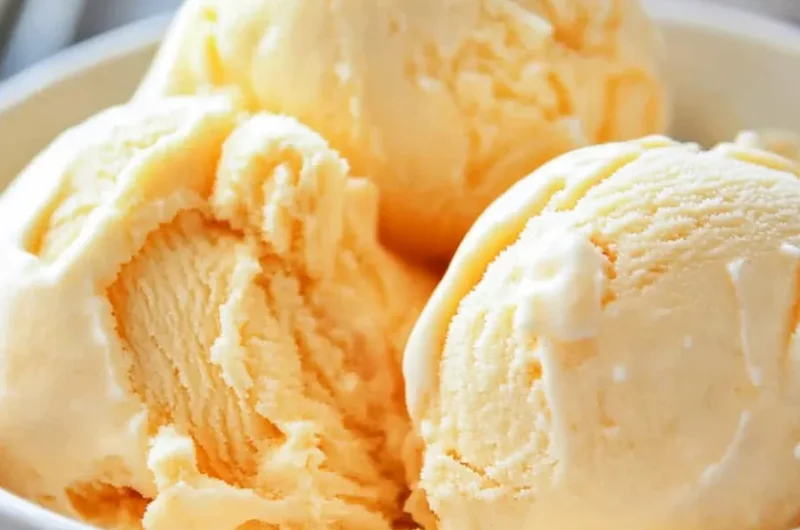
Orange Creamsicle Ice Cream is a delightful treat that combines the refreshing taste of oranges with a creamy texture that melts in your mouth. If you’ve ever enjoyed the classic orange creamsicle popsicle, this homemade ice cream is an amazing homage to that nostalgic flavor. Not only is it a perfect way to cool off on a hot summer day, but it also brings back wonderful memories of childhood summers. This creamy dessert is not just a treat; it’s an experience that encapsulates the joys of sunny days and carefree afternoons.
The vibrant citrus flavor paired with a rich, creamy base makes Orange Creamsicle Ice Cream irresistible. Imagine scooping into a bowl of this delightful dessert, the bright orange hue beckoning you to savor each bite. Its unique blend of sweetness and citrus zing promises to be the highlight of your dessert table, whether at a summer picnic or a casual family dinner. In this article, you will learn why this recipe is so special, how to make it, and tips for serving it perfectly. Get ready to dive into the amazing world of Orange Creamsicle Ice Cream!
Making this ice cream is surprisingly simple, using only a few ingredients that you may already have in your kitchen. Its simplicity doesn’t compromise on flavor; in fact, the creamy texture and bright orange flavor will surely impress your friends and family. So, let’s explore why you’ll love this Orange Creamsicle Ice Cream recipe and how you can create this delightful dessert at home!
Why You’ll Love This Recipe
There are countless reasons to fall in love with Orange Creamsicle Ice Cream. Here are some of the key highlights:
1. Easy Preparation: This recipe requires minimal effort, allowing you to focus on enjoying the delicious outcome.
2. Refreshing Flavor: The combination of orange and cream is refreshing and perfect for warm weather.
3. Customizable Recipe: You can easily adjust the sweetness or use different types of milk for dietary preferences.
4. Family-Friendly: This dessert is loved by both kids and adults, making it suitable for gatherings of all ages.
5. No Ice Cream Maker Needed: You can make this ice cream without special equipment, simplifying the process.
6. Perfect for Any Occasion: Whether you’re hosting a summer bash or simply treating yourself, this recipe is ideal for all occasions.
With these fabulous features, it’s no wonder that Orange Creamsicle Ice Cream is a favorite among many. No matter where you serve it, this creamy delight is bound to become a summer staple!
Preparation and Cooking Time
The total time to prepare Orange Creamsicle Ice Cream is approximately 4 hours, which includes some refrigeration time for the ingredients. Here’s a breakdown:
– Preparation Time: 15 minutes
– Chilling Time: 2 hours (for the mixture)
– Freezing Time: 2 hours
This time may vary slightly based on your kitchen setup, but you can follow this outline to get the perfect texture for your ice cream.
Ingredients
– 2 cups heavy cream
– 1 cup whole milk
– 1 cup sugar
– 1 tablespoon pure vanilla extract
– 1 cup fresh orange juice
– Zest of 1 orange
– A pinch of salt
Step-by-Step Instructions
Creating this Orange Creamsicle Ice Cream is straightforward. Follow these simple steps:
1. Combine Cream and Milk: In a mixing bowl, whisk together the heavy cream and whole milk until combined.
2. Add Sugar and Salt: Gradually add the sugar and a pinch of salt, whisking until dissolved.
3. Incorporate Vanilla: Stir in the vanilla extract to add flavor.
4. Mix in Orange Juice and Zest: Gently fold in the fresh orange juice and zest, ensuring even distribution.
5. Chill: Cover the mixture and refrigerate for at least 2 hours. This step helps the flavors meld.
6. Freeze Mixture: Transfer the chilled mixture into an ice cream maker and churn according to the manufacturer’s instructions. If you don’t have an ice cream maker, pour the mixture into a freezer-safe container.
7. Manual Freezing (if needed): If using a freezer-safe container, freeze the mixture for 30 minutes, remove it, and stir vigorously to break up any icy lumps. Repeat this process every 30 minutes over the next 2 hours.
8. Final Freeze: Allow the ice cream to freeze completely for at least 2 additional hours or until firm.
9. Serve: Scoop into bowls and enjoy the deliciousness!
By following these steps, you’ll create a refreshing treat that embodies the flavors of summer.
How to Serve
Serving Orange Creamsicle Ice Cream can be just as fun as making it. Here are some ideas to make it extra special:
1. In Attractive Bowls: Use colorful bowls to enhance the vibrant orange color of the ice cream.
2. Garnish with Slices: Top each serving with fresh orange slices or zest for an added touch of elegance.
3. Pair with Toppings: Offer a selection of toppings such as sprinkles, chocolate chips, or crushed nuts for added texture.
4. Create Sundaes: Build a fun ice cream sundae by adding whipped cream, cherries, or a drizzle of chocolate sauce.
5. Serve with Waffle Cones: For a classic touch, serve the ice cream in waffle cones for easy enjoyment.
6. Blend into Shakes: Turn leftovers into refreshing milkshakes by blending with a splash of milk.
These serving suggestions will elevate the experience of enjoying Orange Creamsicle Ice Cream, making it a delightful treat everyone will love!
Additional Tips
– Use Fresh Oranges: For an authentic flavor, always use fresh oranges for juicing and zesting. This enhances the natural citrus flavor of the ice cream.
– Chill Bowls and Utensils: Before starting, chill your mixing bowl and whisk. This helps maintain a cold temperature, promoting a smoother ice cream texture.
– Avoid Over-Whisking: When mixing in the orange juice and zest, be careful not to over-whisk. You want a gentle blend to avoid incorporating too much air.
– Taste Test: Adjust the sweetness of the mixture to your liking. If you prefer a sweeter ice cream, you can add a little extra sugar before chilling.
Recipe Variation
Get creative with your Orange Creamsicle Ice Cream! Here are some enjoyable variations to experiment with:
1. Chocolate Swirl: Swirl in some chocolate fudge sauce just before freezing for a delicious chocolate-orange contrast.
2. Vegan Option: Substitute heavy cream and whole milk with almond milk and coconut cream for a vegan-friendly version.
3. Berry Twist: Add fresh blueberries or raspberries to give the ice cream a fruity burst. Note that it will slightly alter the classic flavor.
4. Ginger Kick: Mix in finely grated ginger for a refreshing zing that complements the citrus flavors.
Freezing and Storage
– Storage: Store your Orange Creamsicle Ice Cream in an airtight container to keep it fresh. It should stay good for about 2 weeks in the freezer.
– Freezing Tips: To avoid ice crystals, ensure the container is well-sealed and minimize air exposure by smoothing the surface before sealing.
Special Equipment
While you can create this delicious ice cream with minimal tools, a few specific items can make the process easier:
– Mixing Bowl: A large bowl for combining and whisking the ingredients.
– Ice Cream Maker: If you have one, it simplifies the churning process, leading to a creamier texture.
– Freezer-Safe Container: A durable container for storing your ice cream once it’s churned and ready to freeze.
– Whisk: A handheld whisk or electric mixer for blending the ingredients evenly.
– Measuring Cups and Spoons: Essential for accurate ingredient measurement.
Frequently Asked Questions
Can I make this recipe without an ice cream maker?
Yes! Follow the manual freezing method included in the instructions for a delicious outcome.
How long does Orange Creamsicle Ice Cream last in the freezer?
It will typically last for about 2 weeks if stored properly in an airtight container.
Is there a non-dairy option for this recipe?
Absolutely! Use coconut cream and almond milk to create a dairy-free version.
Can I adjust the sweetness?
Yes, feel free to add more or less sugar to suit your taste. Just remember to taste the mixture before freezing!
What can I serve with Orange Creamsicle Ice Cream?
It pairs well with a variety of toppings like fresh fruit, waffle cones, or simply enjoyed on its own.
Conclusion
Creating your own Orange Creamsicle Ice Cream is an exciting endeavor, one that will bring joy to any summer gathering. This creamy, dreamy dessert captures all the nostalgic flavors of childhood while remaining incredibly simple to make. With fresh oranges, deliciously rich cream, and a customizable recipe, you’re on your way to crafting a treat that will leave everyone asking for seconds. Enjoy this wonderful combination of citrus and cream, and let every scoop remind you of sunny days and carefree moments spent with loved ones.
Orange Creamsicle Ice Cream: An Amazing Ultimate Recipe
- Total Time: 15 minutes
Ingredients
– 2 cups heavy cream
– 1 cup whole milk
– 1 cup sugar
– 1 tablespoon pure vanilla extract
– 1 cup fresh orange juice
– Zest of 1 orange
– A pinch of salt
Instructions
Creating this Orange Creamsicle Ice Cream is straightforward. Follow these simple steps:
1. Combine Cream and Milk: In a mixing bowl, whisk together the heavy cream and whole milk until combined.
2. Add Sugar and Salt: Gradually add the sugar and a pinch of salt, whisking until dissolved.
3. Incorporate Vanilla: Stir in the vanilla extract to add flavor.
4. Mix in Orange Juice and Zest: Gently fold in the fresh orange juice and zest, ensuring even distribution.
5. Chill: Cover the mixture and refrigerate for at least 2 hours. This step helps the flavors meld.
6. Freeze Mixture: Transfer the chilled mixture into an ice cream maker and churn according to the manufacturer’s instructions. If you don’t have an ice cream maker, pour the mixture into a freezer-safe container.
7. Manual Freezing (if needed): If using a freezer-safe container, freeze the mixture for 30 minutes, remove it, and stir vigorously to break up any icy lumps. Repeat this process every 30 minutes over the next 2 hours.
8. Final Freeze: Allow the ice cream to freeze completely for at least 2 additional hours or until firm.
9. Serve: Scoop into bowls and enjoy the deliciousness!
By following these steps, you’ll create a refreshing treat that embodies the flavors of summer.
- Prep Time: 15 minutes
- Cook Time: 0 minutes
Nutrition
- Serving Size: Approximately 8 servings
- Calories: 270 kcal
- Fat: 16g
- Protein: 3g