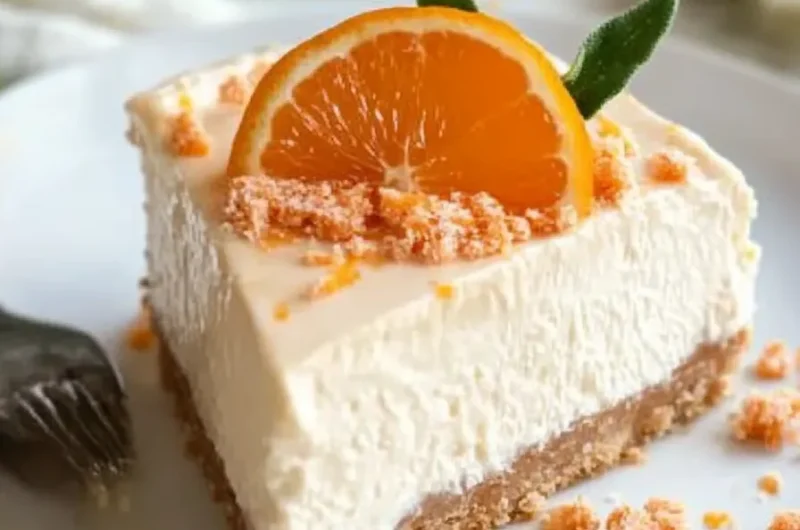
No Bake Orange Creamsicle Cheesecake is the perfect dessert for anyone who loves the refreshing taste of oranges combined with the rich texture of cheesecake. This delightful treat brings back memories of summer days and ice cream trucks, but without the fuss of baking. With each creamy bite, you’ll experience a burst of citrus flavor that’s simply incredible. Whether you’re preparing for a family gathering, a special occasion, or just a sweet craving, this cheesecake will surely bring a smile to your face.
Imagine a dessert that requires minimal effort yet yields stunning results. No Bake Orange Creamsicle Cheesecake does just that. The combination of creamy cheese, zesty orange, and a buttery crust creates a symphony of flavors that will leave your guests raving about it long after the last slice has disappeared. Not only is it easy to make, but it also requires no oven time, making it a convenient choice for those warm days when turning on the oven is the last thing you want to do. In this guide, you’ll discover the reasons why this recipe is truly special and how you can easily whip it up at home.
From parties to potlucks, No Bake Orange Creamsicle Cheesecake is sure to impress. The light and airy texture combined with its visually appealing look makes it a standout dessert. With its vibrant orange color, it also elevates the aesthetic of your dessert table. Whether you’re new to baking or a seasoned pro, this recipe is straightforward and forgiving, ensuring everyone can enjoy a delicious slice. Let’s dive into why this cheesecake is a must-try!
Why You’ll Love This Recipe
No Bake Orange Creamsicle Cheesecake offers a delightful mix of taste, ease, and presentation that makes it beloved by many. Here are some compelling reasons why this recipe should be on your dessert radar:
1. No-Bake Convenience: Perfect for warm weather, this cheesecake eliminates the need to heat your kitchen.
2. Effortless Preparation: The straightforward steps make it accessible for bakers of all levels.
3. Refreshing Flavor: The sweet and tangy orange flavor is perfect for any occasion, bringing a splash of brightness to your dessert spread.
4. Crowd-Pleasing Appeal: This cheesecake is sure to impress your family and friends, becoming the highlight of your gatherings.
5. Versatile Toppings: Customize it with your choice of toppings, like whipped cream or fresh fruit, for an additional flavor boost.
6. Make-Ahead Friendly: Prepare it in advance and store it in the fridge until you’re ready to serve, making it a great option for busy hosts.
With these reasons in mind, it’s easy to see why No Bake Orange Creamsicle Cheesecake is such a favorite. Each slice is a little piece of sunshine that brings joy to any occasion!
Preparation and Cooking Time
Making No Bake Orange Creamsicle Cheesecake is a breeze. Here’s a quick breakdown of the time you’ll need:
– Preparation Time: 20 minutes
– Chilling Time: 4-6 hours (or overnight for best results)
All in all, you can have this delightful cheesecake ready to chill in just a short period, but make sure to leave enough time for it to set properly in the fridge. Patience is key to achieving that perfect creamy texture!
Ingredients
– CRUST
– 1 ½ cups graham cracker crumbs
– ⅓ cup granulated sugar
– ½ cup unsalted butter, melted
– FILLING
– 8 ounces cream cheese, softened
– ½ cup powdered sugar
– 2 cups whipped topping (like Cool Whip)
– 1 cup orange juice (freshly squeezed is best)
– Zest of 1 orange
– 1 teaspoon vanilla extract
– 1 packet unflavored gelatin (optional, for extra firmness)
– GARNISH (optional)
– Fresh orange slices
– Additional whipped topping
– Orange zest for sprinkle
Step-by-Step Instructions
Creating this delectable dessert is as easy as pie—well, cheesecakes, to be specific! Follow these simple steps:
1. Prepare the Crust: In a bowl, combine graham cracker crumbs, granulated sugar, and melted butter. Mix until well combined.
2. Form the Crust: Press the crumb mixture firmly into the bottom of a 9-inch springform pan to create an even layer. Set aside to firm up.
3. Create the Filling: In a large mixing bowl, beat the softened cream cheese and powdered sugar together until smooth and creamy.
4. Add Flavor: Mix in the orange juice and zest, followed by the vanilla extract. Ensure everything is blended well.
5. Incorporate Whipped Topping: Gently fold the whipped topping into the cream cheese mixture until blended.
6. Optional Gelatin: If using, dissolve the gelatin according to the package instructions and fold it into the filling for a firmer cheesecake.
7. Combine: Pour the filling over the prepared crust in the springform pan, smoothing the top with a spatula.
8. Chill: Cover the pan with plastic wrap and place it in the refrigerator to chill for at least 4-6 hours or overnight.
9. Remove From Pan: Once the cheesecake has set, carefully remove the sides of the springform pan.
10. Garnish and Serve: Top with additional whipped cream, fresh orange slices, and a sprinkle of orange zest before serving.
By following these easy steps, you’ll have an amazing No Bake Orange Creamsicle Cheesecake that looks as good as it tastes!
How to Serve
Serving No Bake Orange Creamsicle Cheesecake can be a delightful experience for both you and your guests. Here are some ideas for making the most of your presentation:
1. Slice Presentation: Cut generous slices using a warm knife for clean edges. This offers a beautiful look when served.
2. Accompaniments: Pair with fresh strawberries or cherries on the side for a colorful addition to your plate.
3. Decorative Touches: Add dollops of whipped cream or orange slices on each slice for an eye-catching finish.
4. Refrigerate Leftovers: Keep any leftovers in the refrigerator covered to maintain freshness. This cheesecake is also excellent straight from the cold fridge!
5. Beverage Pairing: Serve with iced tea, lemonade, or a refreshing cocktail that complements the orange flavor.
With these serving tips, you’re not just delivering a dessert; you are providing a delightful experience that everyone will remember. Enjoy every creamy bite of your No Bake Orange Creamsicle Cheesecake!
Additional Tips
– Use Fresh Ingredients: For the best flavor and texture, opt for fresh oranges and quality cream cheese. Fresh ingredients make a difference in taste.
– Chill Thoroughly: While you may be eager to serve your No Bake Orange Creamsicle Cheesecake, ensure it’s properly chilled for at least 4 hours. The cheesecake sets better when chilled longer.
– Experiment with Flavors: Don’t hesitate to try different citrus fruits such as lemon or lime for varying flavor profiles.
– Don’t Overmix: When combining the whipped topping with the cream cheese mixture, gently fold it in. This keeps the cheesecake light and airy.
– Garnish Creatively: Add a touch of creativity to your garnishes. Consider using mint leaves alongside oranges for a pop of color.
Recipe Variation
Feel free to customize your No Bake Orange Creamsicle Cheesecake! Here are a few variations to inspire you:
1. Chocolate Orange Cheesecake: Swirl in some melted chocolate into the filling for a delicious chocolate-orange flavor combination.
2. Vegan Option: Substitute cream cheese with a vegan cream cheese alternative and use coconut whipped topping to cater to vegan diets.
3. Mini Cheesecakes: Create individual servings by using cupcake liners in a muffin tin. This makes for easy serving and portion control.
4. Tropical Twist: Add crushed pineapple or mango puree to the orange filling for a tropical experience that’s sure to delight.
5. Nutty Crust: Incorporate finely chopped nuts into the crust mixture for an added crunch and flavor depth.
Freezing and Storage
– Storage: Keep the cheesecake covered tightly in the fridge. It stays fresh for about 5-7 days.
– Freezing: You can freeze slices of No Bake Orange Creamsicle Cheesecake for up to 3 months. Wrap each slice in plastic wrap and then in aluminum foil to prevent freezer burn. Thaw in the refrigerator before serving them.
Special Equipment
You will need a few essential tools to prepare this cheesecake successfully:
– Mixing Bowls: A large bowl for the filling and a smaller one for the crust.
– Springform Pan: This makes removing the cheesecake easy and presents it beautifully.
– Electric Mixer: An electric mixer ensures the cream cheese is blended smoothly without lumps.
– Spatula: Use this to smooth the filling over the crust and to gently fold in the whipped topping.
– Plastic Wrap: For covering the cheesecake while it chills to prevent it from absorbing odors.
Frequently Asked Questions
Can I use different citrus juices?
Yes, you can substitute orange juice with lemon, lime, or even grapefruit juice for unique flavors.
How can I tell when it’s set?
The cheesecake should be firm to the touch and hold its shape when cut.
Is it suitable for kids?
Absolutely! The refreshing taste and creamy texture make it an appealing option for kids and adults alike.
Can I make this cheesecake gluten-free?
Yes, use gluten-free graham cracker crumbs or alternative crust options like crushed nuts or oats.
What’s the best way to store leftovers?
Always cover the cheesecake well. Store it in the fridge, and it should stay fresh for several days.
Conclusion
No Bake Orange Creamsicle Cheesecake is a spectacular dessert that captures the essence of summer in every creamy bite. Its refreshing orange flavor and easy preparation make it an excellent choice for any occasion. Whether serving at a potluck, family gathering, or simply satisfying a sweet tooth, this cheesecake promises to be a hit. The vibrant color and delightful taste create lasting memories that everyone will cherish. Treat yourself to this no-bake wonder and enjoy the simple pleasures it brings!

No Bake Orange Creamsicle Cheesecake: An Amazing Ultimate Recipe
- Total Time: 9 minute
Ingredients
– CRUST
– 1 ½ cups graham cracker crumbs
– ⅓ cup granulated sugar
– ½ cup unsalted butter, melted
– FILLING
– 8 ounces cream cheese, softened
– ½ cup powdered sugar
– 2 cups whipped topping (like Cool Whip)
– 1 cup orange juice (freshly squeezed is best)
– Zest of 1 orange
– 1 teaspoon vanilla extract
– 1 packet unflavored gelatin (optional, for extra firmness)
– GARNISH (optional)
– Fresh orange slices
– Additional whipped topping
– Orange zest for sprinkle
Instructions
Creating this delectable dessert is as easy as pie—well, cheesecakes, to be specific! Follow these simple steps:
1. Prepare the Crust: In a bowl, combine graham cracker crumbs, granulated sugar, and melted butter. Mix until well combined.
2. Form the Crust: Press the crumb mixture firmly into the bottom of a 9-inch springform pan to create an even layer. Set aside to firm up.
3. Create the Filling: In a large mixing bowl, beat the softened cream cheese and powdered sugar together until smooth and creamy.
4. Add Flavor: Mix in the orange juice and zest, followed by the vanilla extract. Ensure everything is blended well.
5. Incorporate Whipped Topping: Gently fold the whipped topping into the cream cheese mixture until blended.
6. Optional Gelatin: If using, dissolve the gelatin according to the package instructions and fold it into the filling for a firmer cheesecake.
7. Combine: Pour the filling over the prepared crust in the springform pan, smoothing the top with a spatula.
8. Chill: Cover the pan with plastic wrap and place it in the refrigerator to chill for at least 4-6 hours or overnight.
9. Remove From Pan: Once the cheesecake has set, carefully remove the sides of the springform pan.
10. Garnish and Serve: Top with additional whipped cream, fresh orange slices, and a sprinkle of orange zest before serving.
By following these easy steps, you’ll have an amazing No Bake Orange Creamsicle Cheesecake that looks as good as it tastes!
- Prep Time: 15 minutes
- Cook Time: None
Nutrition
- Serving Size: 12 slices
- Calories: 320 kcal
- Fat: 15g
- Protein: 3g